Pages

Wednesday, November 26, 2014

Chair Refinishing: Ms. Kim


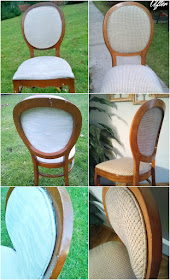
A customer asked if I would just simply reupholster with new cushioning and refinish the wood of this cute chair for her. I was honored with the request and fortunate Kim knew what she wanted while supplying the fabric. It has been with her for a long time; even during her college days. It belongs in her craft room and she has no plans of removing it from her home. 


The years of use showed with some dings and nicks here and there. A few of spots of paint too and there was a seam split. 


First, I removed all of the upholstery pieces. Then set up to repair the split. 


I mixed  wood filler, stain and wood glue together into a thick gluey paste...


then applied it into the split. 


After squeezing in as much of the filler that I could, I sandwiched the wood together and clamped it. 


I wiped off the excess and ooze. Then started to remove more staples and nails from the backrest frame. 


With drying and set up time needed for the mixture to cure, I started to remove the fabric from the seat to reupholster it. There was a label, showing the chair was remade and disinfected with a date of 9/12/71. (Faded, but was able to read it.) How cool is that?! 


Kim mentioned memory foam, so that is what I bought to use for a new cushion. Recovering the seat went quick and easy. 


Here is her pretty fabric.


The next day, the wood filler mix was dry enough to start sanding.  I took the chair apart to reach into the curves by hand. I used the palm sander on the flat surfaces. 
The repaired section


After sanding, I put the frame back together, gluing the joints. 


 Here is the repaired area after applying stain. 


After the stain dried, I sealed it with polyurethane.


Then replaced the seat in its place. 


Now I needed to reupholster the backrest. When removing the fabric, I found three coverings and lots more staples and nails. Everything had to go for a clean slate.


I bought pvc clothesline to make the cord trimming. It works like a charm. It remains in place, curves easy and makes sewing the trimming a breeze. 


I had to recover the back first, so I stapled the fabric in place from the inside of the frame.


Then stapled the cord trim onto the front piece. Once I measured the center, I used finishing nails to secure it in place. 


And wah-lah! Miss Kim's chair is renewed! 


It's the cutest chair! So curvy and the front legs being quite dainty. The semi oval backrest defines the chair.  I love it.  Hopefully it lasts through her crafting years... or who knows, maybe her daughter will take it to college too! 


~~~~~~~~~~~~~~~~~~~~~~~~~~~~~~~~~~~~~~~~~~~~~~


Friday, November 21, 2014

Friday Five: Fabulous Furniture Features No. 9


Welcome to


This is where I share my five favorites that I scouted out during the week. 

Super amazing stuff. 


  Seriously. 


In no particular order because they are each,  just too splendid,  please enjoy these fabulous works. 


Colonial Style Frenchified

by Amanda at 
Girl in Pink


I would be proud to "Crown Thee". 

The mirror, the desk and the chair. Stately done. Admiring the desk top wood grain, I can't help turning back to stare at the chair. Perfectly angled appliques changed its personality. You can read Amanda's post at Girl in Pink while gazing into more of her projects. 


French Server in Old White

by Kelli at 

Little Cottage of Mine


Classic beauty. 

Having a French Server with long detailed legs is one thing but to include a beautifully decorated shelf front too, is just uncommon.  The original hardware is breathtaking.  Kelli's story of how this table came to be is posted at Little Cottage of Mine


Pottery Barn Printer's Keyhole Desk Knock-off Tutorial

by Elisha at 

                 Pneumatic Addict Furniture


This Knockoff knocks your socks off! 

Elisha was intent on this project. It's not a redo. It's not a repurpose. She BUILT it. 

Love the faux front drawers that open for space... enough space for a printer! You will see how, with her fabulous tutorial, at Pneumatic Addict Furniture. And of course, you'll see many more of her built creations. 


For the Love of Old-  Antique French Cane 
by Loretta at 
Full Bloom Cottage


Amour de Paris.

Shape, texture, delicate details describes this antique beauty. It's like a romantic dream. You must see Loretta's post that includes more items to go with this at Full Bloom Cottage.


Sophisticated Artissimo Buffet

by Stacey at 

Artissimo Milk Paint Buffet - Embracing Change

Artissimo Milk Paint Buffet - Embracing Change

Artissimo Milk Paint Buffet - Embracing Change
Extremely handsome. 

Defined lines. Slight distressing exposes a warm wood. The gorgeous hardware stands out. I want this.  I can find room for it by moving out other things; I bet I could.  I wonder if I can convince Stacy at Embracing Change to let me adopt it. 


grab button for Redo It Yourself Inspirations


Well, I'm inspired by these fabulous pieces of furniture.


I hope you enjoy them as much as I do.


Friday Five won't be posted next week, but will return the following week, on December 5th.  


Happy Thanksgiving! 


~~~~~~~~~~~~~~~~~~~