Showing posts with label decoupage. Show all posts

Saturday, March 5, 2016

Upcycled Vintage Tray: French Kitchen Art Tutorial


What to do with a vintage metal tray? Make it your own style!
 In this case, I used an antiquing method to add a little French flair in the kitchen.

This heavy old tray came from a thrift shop. It had charm, but I disliked the decor decal.


With the idea of turning it into a French antique tray, I cleaned and sanded it. Then printed out some graphics to decoupage onto it.


For raised scroll work, I swirled on some white glue all around the decoupaged prints.


Then painted the glue and the rest of the tray with white acrylic paint. I lightly painted over the graphics to blend with the glue work.


After the paint dried, applied a clear coat in polycrylic. 


Then rubbed on wood stain. 


Where the stain didn't take over the glue, I painted on dark brown acrylic paint to finish the antique process. 


 Finally, a light clear coat of polycrylic over the entire surface.


The final results.


The sides and back of the tray remained original... a rusty patina.


It's "artsy-craftsy" wall decor, but the technique can be applied to numerous subjects. Maybe on furniture, mirror/picture frames, boxes, trunks, reclaimed wood, cans, scrap metal, cardboard... so many options! 

Saturday, November 28, 2015

Christmas Candle Sleeve from a Soda Bottle


The cheapest and easiest way to make candle sleeves to match your holiday napkins is to decoupage them onto plastic 2 liter bottles.


Simply cut out the middle section of the bottle. 


And then, cut your holiday printed napkin to fit the bottle section. 


Separate the printed layer from the plain layer of the napkin. 


Then decoupage on.


Allow it to dry. 


Insert a glass enclosed candle inside the sleeve.  


That's it! Very easy! 


(Of course we all know NOT to leave the candle unattended and always keep them away from children's and pet's reach.)


Thursday, November 5, 2015

Decoupage Thanksgiving Basket


I've been on a basket kick.

They are wonderful for organizing and placing on open shelves. My last trip to the thrift shop was in search for a few to use in the laundry cabinet. I found a couple; plus a bonus basket. One that I can decorate for Thanksgiving. So I stopped and picked up some paper Thanksgiving napkins too.


Of course it was with the intention of decoupage.

It's so easy. And it dries quickly.

I washed the basket with hot water and soap. While it was still wet, I cut up the parts of the napkins I wanted and decoupaged the pieces onto the basket. Just around the sides, leaving the top and bottom as wicker for bordering.


After it dried, I clear coated the entire basket; inside, outside and over the decoupage.
The shiny basket looked new; and better with a rustic appearance.


The clear coat took a bit longer to dry.


The basket is perfect for dinner rolls.


It's going be nice touch during Thanksgiving dinner.


I'm going to do another one for the Christmas dinner table.

~~~~~~~~~~~~~~~~~
Featured at


Saturday, September 5, 2015

French Country Kitchen Plate


I picked up this clear plate at a thrift shop just to decoupage a print onto it. Glass is fun to decoupage because it's super easy to do.


The key to a good decoupage is to apply a thin layer of Mod Podge or decoupage solution.


What's great about using glass is, it's easy to see where the print can be centered. You get a visual before placing the brushed plate onto the print.

But you need to be quick about it. Applying a thin coat of the solution means it will dry fast.


Once the print is affixed to the plate. Rub out any creases. Then apply a coat of the solution over the paper on the back of the plate. It will need more rubbing to remove bubbles, etc.


Once it's dried, trim off excess paper around the edge of the plate with a razor blade or exacto knife.


This clear glass decoupage project can work with any print you want. Including photos...


I liked this print for the kitchen.


You can use magazine pages, newspapers, gift wrap, tissue paper... any print or pattern to create your art piece.


This method of decoupage on glass is great for preserving something you really like. Maybe do this with a special announcement card? A favorite recipe? Wedding photo? Favorite place you've visited? Maybe make this as a gift to preserve something for the recipient. So many options!


It can be a permanent photo frame.
The best part is that it's so easy.
And quick!


~~~~~~~~~~~~~~~~~~~~~~~~~~~~~~~~~~~~~~~~~~~~~~~


Sunday, August 30, 2015

Spooky Halloween Party Table Decor


Halloween is just around the corner and if you're planning a party... I've got some recycling ideas to make your serving table funny and spooky!

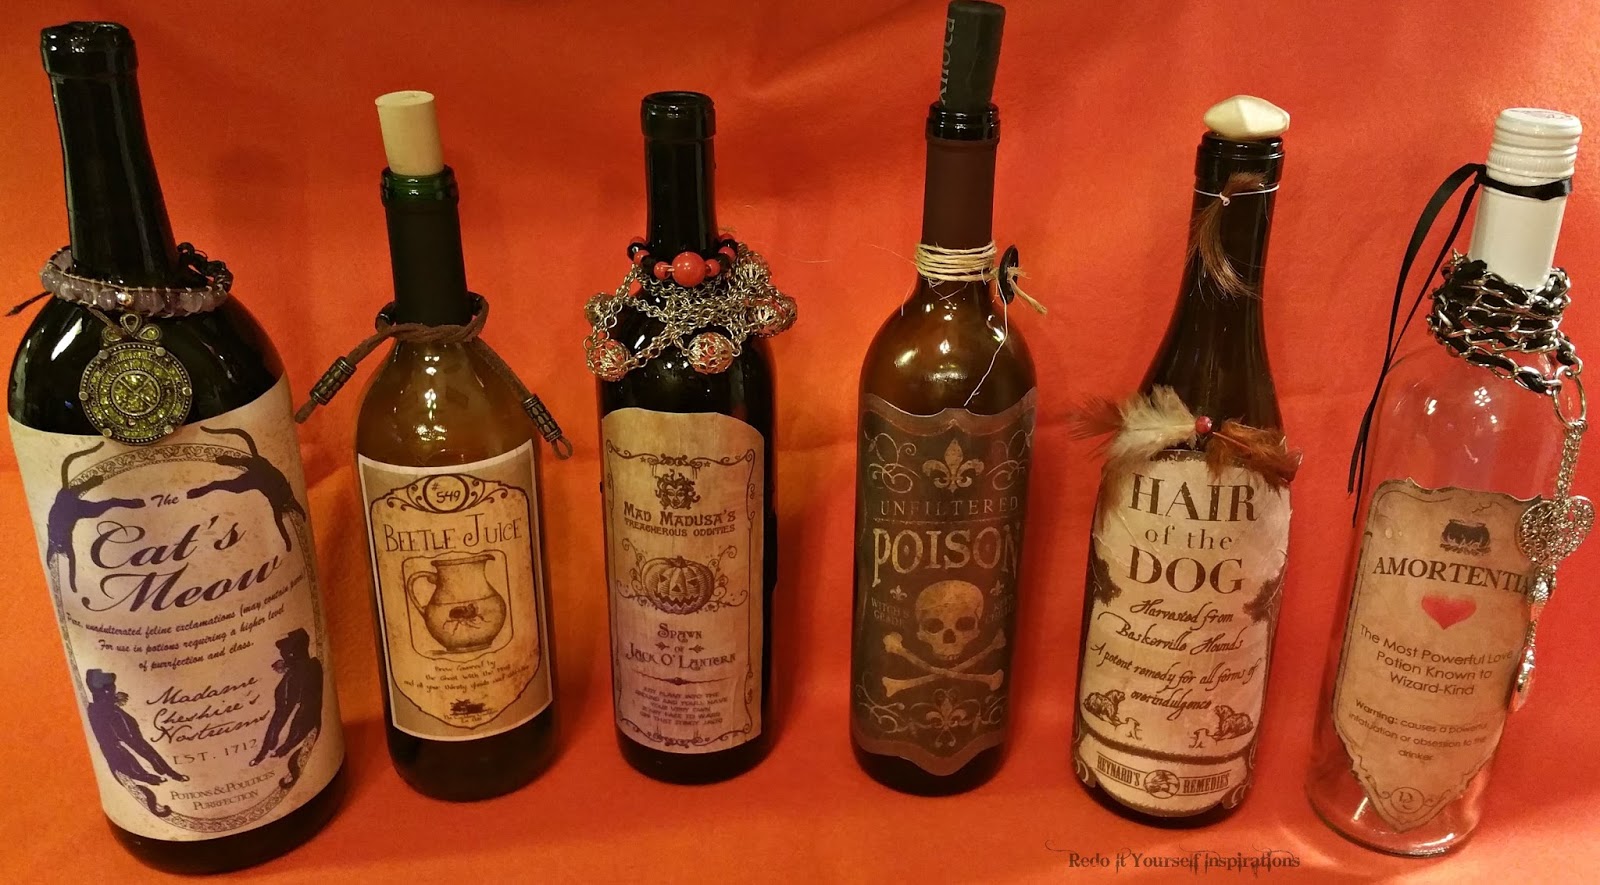
By using bottles, jars and cans, with glued on labels and other embellishments, you can make Halloween table decor much more fun!

Check this out:


Print labels
Trim them off
Glue them onto...


bottles, cans, jars, actually any kind of containers... even wooden fruit crates! Then decoupage over the labels.


... and embellish with beads, jewelry and other trimmings.


The results are dressed up Halloween servers!

These recycled bottles can used for punch, juice, cider, water or whatever your choice beverage is.


I used an old button and twine on the neck of this bottle.


An amethyst and leather bracelet along with a broken pendent decorated this one.


I used an outdated necklace and strung some beads on this bottle.


Here are my other spooky containers.


A can wrapped with the "Scarecrow Stuffings" label and twine glued on is awesome for pretzel rods, lolly pops, twizzlers, etc.

A painted peanut butter jar decorated with rope and an old clip on earring can hold m&ms, candy corn or other treats.

And a spice jar with a satin ribbon tied on can hold tiny candies... like cinnamon buttons.


This cut bottle has "Bat Wings" for a label. It could hold tortilla chips or jerky.
The olive jar is labeled with "Eye of Newt" and would be fun with chocolate chips in it.
And the salsa jar is recycled into a "Dried Rat Tails" container... maybe some small pretzel sticks would be funny!


There are so many different types of containers to use for decor too. You can try salad dressing bottles to make "potions"; ketchup and mustard containers, jam and jelly jars, coffee creamer bottles, and even wicker baskets to hold popcorn, etc.
The ideas are endless.


These bottles would look awesome with grape juice or red fruit punch in them.


This is so easy and fun that the whole family can get in on the crafting to decorate for your party. 


Beads, chains, strings, yarn, leather and much more can be used to decorate around the labels just by simply gluing them on.


I found my labels on Pinterest and I made a board of about 45 of them. If you want to grab these for yourself, here's the link --->  Halloween Labels.


I posted this early enough to get started before October in hopes to give you some ideas for decorating in plenty of time.

Have fun!!!!


~~~~~~~~~~~~~~~~~~~~~~~~~~~~~~~~~~~~~~~~~~~~~~~~~~~~~~~~~~~~~~
Featured at