


My mom had this old kitchen cabinet island, temporarily, while my father built her a whole new kitchen. When she was ready to toss this out, I ran for it!
I was so happy to bring it home and put it to permanent use in my own kitchen. It's very large and heavy.
What I love about it... actually a few things... is that is accessible from both sides.
It has tons of storage space.
It fits the long and narrow kitchen.
It gives me a big open work area.
Here it is, on its side for bottom repair work:

My brother made the top for mom while she used it, and I'm going to keep it as is. It suits the style and color of the kitchen.
The drawers function on one side...

Had.
My dad made cubbies with drop down fronts.
More storage... more happiness!
The cubbie side had router edges and the drawer side didn't so they had to be matched up. After that and some sanding, it was easy painting.

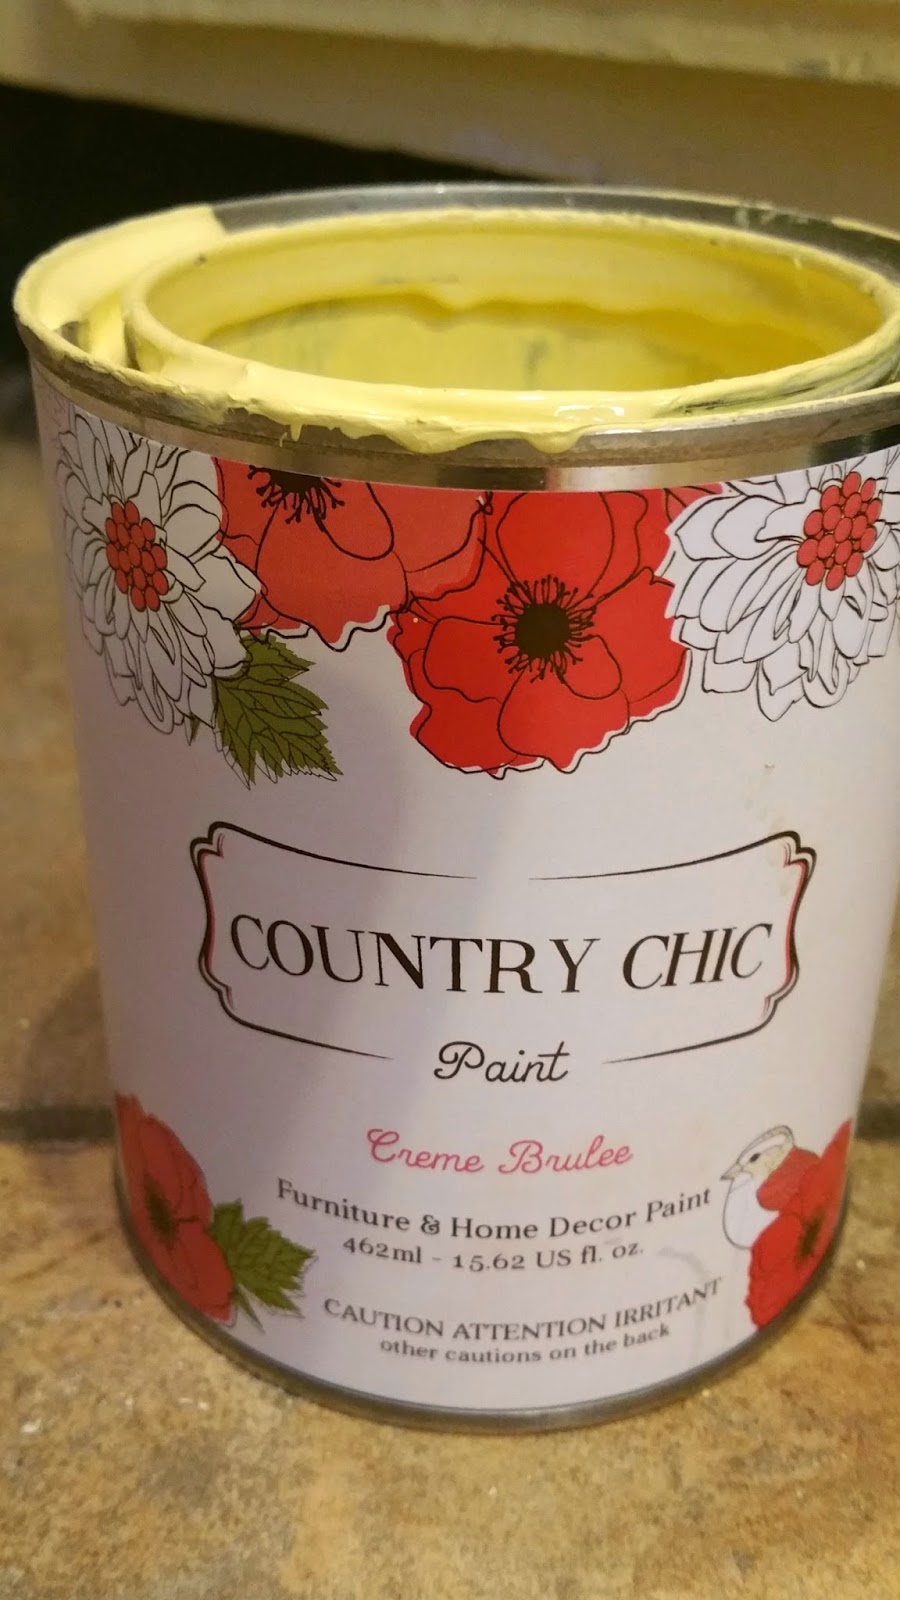
I knew I was going to paint it and make it look antique Country French or shabby.
When choosing the paint, I wanted a nice creamy like "buttah" color.
This chalk paint from Country Chic in Creme Brulee was the perfect choice!
So I painted this delicious color onto the entire base of the island. (I reeeally like it on the wainscoting side!)

It covered so well with just one coat.


The paint dried quickly and I was dark waxing the very next day.

The Dark Brown Antiquing Wax from Country Chic Paint is beautiful! I love working with it.

Leaving wax on heavy in many areas and wiping and rubbing gave the cabinet a very old look.
When my youngest son looked at the finished work, he said just what I wanted to hear... "Mom, it looks 200 years old!"
Quite the opposite of the usual... "Looks brand new" comment.
awww... thank you, honey!

My kitchen has a lot of iron accents so my hardware had to be heavy and dark.
Boy, was I super excited to find these cast iron drawer knobs and pulls in Fleur de lis at the craft store!

AND, I shopped for wood appliques to decorate the doors.

I super glued the wood onto the doors (after taking 2 days of deciding how I wanted them); then painted on the Creme Brulee; then waxed the crevices.

I really wanted to add cornices to the corners of the island but there was no space for them. Bummer.
That was until I found these knobs... on clearance! HA! Mini cornices, right????

I attached one and thought it appeared too small. So I added a second one and ended up with a heavier cornice! It did the magic.

Then, as thrifty as I can be, I had this votive candle holder that I don't use anymore. Drilling holes through it to mount on the island would make a great towel grabber for me while cooking.

Doing just that, the end of this island is in front of my cooking range, so this was just a big bonus!

Then, to French up the island some more, I used these dollar store napkins to decoupage the drawers.


It's finally done and we have a clean kitchen again!
(The tools weren't fun to live with... phrases such as "pass me the drill and the salt please" existed for an entire two weeks. )


I think I pulled off the old Country French feel.
(Now, to work on the modern cabinets in the rest of the kitchen!)
Proudly featured at:


Gorgeous~ you always have the most fabulous pieces!
ReplyDeletewow! What a transformation. This looks great.
ReplyDeleteThis looks so great!! Nice work. I love the wood top.
ReplyDeleteAww, thank you, Kim!!! I was lucky to snag this up from my mom.
ReplyDeleteThe color is super nice and blends so well.
ReplyDeleteLOL, my ideas were all over this place with this! I was glad to get the right pieces after taking so much time finding them. Thank you, Chris OXOX
So glad you like it!!! Thank you! :)
ReplyDeleteThank you!!
ReplyDeleteI like it the top the way it was, quite rustic. My brother made it from pine.
Love the surprise of decoupaged drawer liners! God is in the details.
ReplyDeleteSeeing the finished project is always a treat, but reading the way you explain how it got from A to Z is so interesting and informative. Another lovely transformation, Robin.
ReplyDeleteRobin this is stunning! It looks amazing with your kitchen like it was meant to be all along. I love that you left the top your brother helped to created and married it with your vision for the base. It's so beautiful. As always, thank you so much for linking this up to our Something to Talk About Link Party. You're so creative. Hope you have an awesome day, Coco
ReplyDeleteWow! You did a fantastic job transforming this! I never would have that much imagination. Thanks for sharing!
ReplyDeleteStopping by from Bloggers Brag Party. You've been pinned! :)
Elise @ Harvey Ever After
Wished I had room for an island....you did a fantastic job.
ReplyDeleteI'm not usually a big fan of "antiquing" but that is gorgeous and looks great in your kitchen. Good job! Those cubbies are genius. :)
ReplyDelete(visiting from the Tuesdays with a Twist link-up)
Wow Robin!! This looks gorgeous. I love the French influences. And adding those pulls as cornices were sheer genius. It looks like it is right at home in your kitchen.
ReplyDeleteAnd to think the inspiration was a package of paper napkins from the dollar store. What a Blessing!
ReplyDeleteThank you, Susan.
This took me a bit because of decisions. The wood appliques were thought of after painting the doors, so it was a little more work to blend it in. Normally they should be applied before painting. So glad you like it, Beverly! Thank you!!!!
ReplyDeleteMy mom couldn't believe I wanted "that old thing" and I told her it was perfect. Now she believes me.
ReplyDeleteThank you for hosting your inspirational link up and visiting. You're a wonderful hostess!
Thank you so much for your kind visit and the pin too!!!
ReplyDeleteI'm wondering if a single cabinet or butcher block type of rolling island would work for you, Pam. My son has a tiny kitchen and I made a coffee table into an island for him. There must be some idea I can help you get your wish. Let me see your kitchen.
ReplyDeleteThank you for your kind compliment! :)
Aww, thanks so much, Julie! I haven't filled the cubbies yet, except one is battery storage for my youngest son's games and electronics. I'm sure after I get spring cleaning done, they will be utilized.
ReplyDeleteThose little carved 60 cent pieces made my day! I'm so glad you like them! Thanks so much, Trish!!!
ReplyDeleteWell, we know who to call when we need a kitchen re-do don't we! Looks awesome.
ReplyDeleteThanks for sharing at Marvelous Monday on Smart Party Planning.
Oh my goodness! What a GORGEOUS makeover! I LOVE the color you chose!! Pinning!! Thank you so much for sharing at the Wonderful Wednesday Blog Hop!!!
ReplyDeleteLOL!! Thank you, Catherine! :)
ReplyDeleteI had to break up the warm woods with a warm but bright color and this did the trick. So glad you like it! Thank you so much for hosting and visiting! :)
ReplyDeleteW.O.W. This is Spectacular! Thank you so much for sharing this with us at VMG206 Brag About It!
ReplyDeleteThis looks great! I love your choice of colors!
ReplyDeleteWhat a perfect transformation! It really does have the country french look. Thanks for linking up at Together on Tuesdays :)
ReplyDeleteWhat an amazing transformation! I just love it!
ReplyDeleteIt would be wonderful if you would stop by my blog and join our Something to Talk Abput link party!
Have a great day!
Karen @ Karensuponthehill.com
Wow...what a great job! I love this. Thanks for sharing the process with the Thursday Blog Hop!
ReplyDeletethe hardware really adds so much. beautifully done. It is hard to tell it was the same piece, Great save. Thanks for sharing on Merry Monday.
ReplyDeleteRobin
ReplyDeleteBeautiful job on the transformation of the kitchen island! Thanks for linking up and linking back to MRL! Catching you!
gail
Oh my word, that is a gorgeous island. I wish I had your talent to redo my kitchen. Thanks for sharing with Small Victories Sunday linkup and Pinning to our linkup board.
ReplyDeleteThanks for linking this terrific re-do at the #ChainLinkyCLIMB :)
ReplyDeleteI LOVE this, what a great redo project! I love love the wainscoting, and the color! Beautiful! Thank you so much for sharing this on Making Memories Mondays! :-)
ReplyDeleteCathy
The decoupage on the drawers is amazing, how unique and gorgeous! Thanks for linking up to the Bloggers Brags Pinterest Party. I have pinned your post to the Bloggers Brags Pinterest Board.
ReplyDeleteWow! You rocked this makeover.Your little details make a big statement too. Thank you for sharing at the Thursday Favorite Things blog Hop. Watch for your feature on Monday xo
ReplyDeleteThat came out really nice. My mom would have loved your rooster. - Margy
ReplyDeleteThis is absolutely beautiful! I love the vintage butterfly draw liners, they are divine. Thanks for linking up at Mum-bo Monday. This post is co-host Jennifer's pick of the party and will be featured this week!
ReplyDeleteThis looks incredible! You are talented. Pinned and tweeted. We are so thrilled to have you at our party. Please stop by on Monday at 7, so we can see your amazing projects. Lou Lou Girls
ReplyDeleteWOW! That is awesome! I can not believe how great it looks. Love all the details, like the mod podge. Come by Merry Monday for another feature! Julia
ReplyDeleteI love this! It looks so great and plus, it's way functional. I'm a little jealous. Thank you for linking up to Tips and Tricks. Hope to see you this week. Kathleen @ Fearlessly Creative Mammas
ReplyDeleteHoly Fantastic Re-Do! The island looks amazing! You do use a good job! Thanks for the inspiration and motivation to make my kids' table fabulous!
ReplyDeleteHoly Fantastic Re-Do! You do such a good job. Thank you for the inspiration and motivation to make my kid's table amazing. :)
ReplyDeleteWow! That is amazing! Beautiful!
ReplyDeleteThanks so much, Laurie! Glad you visited from the link up!
ReplyDeleteThank you, Melissa :)
ReplyDeleteSo happy you visited, Lisa! Thank you!!!
ReplyDeleteI promise to!!! Thank you, Karen!
ReplyDeleteThank you so much for appreciating this creation :)
ReplyDeleteThank you for hosting and visiting too!
The hardware is my favorite. I was so lucky to find them. Thank you, Rachel!
ReplyDeleteOH MY!!! I'm thrilled beyond myself! Thank you so very much!!!
ReplyDeleteThank you so much for the pin!!! Always so glad to see you visit, Tanya!
ReplyDeleteThank you again, Lisa! :)
ReplyDeleteYou're a wonderful hostess!
I think the wainscoting did the best with the dark wax and so glad you like it! Thank you, Cathy!!!
ReplyDeleteWOW!! Thank you Becca!!!! I need to rush over to you!
ReplyDeleteIsn't the decoupage crazy?!?! Only one dollar to do them. I'm thrilled you like them too! Thank you for hosting and visiting! :)
ReplyDeleteThank you for making my day, Katie!!!
ReplyDeleteThank you for hosting and visiting too!
I love kitchen roosters. They live here with some cows and pigs but they are my favorite. :)
ReplyDeleteThank you so much, Margy!
No way!!! I will run right over to Jennifer to thank her! Thank you, Kelly!
ReplyDeleteThank you so much for the pin and tweet!!!
ReplyDeleteYou are too sweet!
This is just beautiful :-)
ReplyDeleteThanks for linking up at the Talented Tuesday Link Party! I hope you head across again this week to link up :-)
Thank you so much for the thrilling feature, Julia!!
ReplyDeleteI'm very lucky! Thank you for hosting and inviting, Kathleen! :)
ReplyDeleteI'm so happy to hear you are working on a redo!!! Hope you come back and share it!!! Thank you!
ReplyDeleteI gotta see that table, Deb!!! Thank you :)
ReplyDeleteThanks a gazillion, Kim!!! :)
ReplyDeleteI will! Thank you for hosting and visiting, Natalie!!!
ReplyDeleteCongratulations! You've been featured on Wicked Awesome Wednesday! Thanks for sharing your kitchen island redo! Feel free to stop by the website to grab your "I've Been Featured!" button.
ReplyDeleteI'm working on it. I promise I'll show it off when it's done.😊
ReplyDeleteThank you so very much, Laurie!!!!
ReplyDeleteI LOVE your kitchen! You did such a great job!
ReplyDeleteKitchen Upgrade Ideas
Kitchen Remodeling Companies