Showing posts with label chalkboard. Show all posts

Tuesday, May 3, 2016

A Refrigerator Cover Up


I'm redoing the kitchen and the one thing that annoys me is...

this BIG white refrigerator! I really can't relocate it and it's... well, a necessity. So we have to keep it. 

Here's the crime scene.


It's blowing out the kitchen here! Something had to be done. I had to hide it. Or try to. 

I thought a chalkboard on the side might dress it up. Plus, it would be really handy. So... I scored this vintage wooden frame at a flea market and it was almost the right size to use for the chalkboard. 


And then there was a big "a-ha moment", my dear, Watson! Beadboard under the chalkboard would give a finished look. Kinda' like a faux wall. Hmmm... this could be a good cover. 


I cut and resized the frame. Then cut the beadboard panels to fit on the refrigerator. 


Then glued the boards together and added duct tape for more support over the glued areas on the back. 

Both the frame and the beadboard needed to go onto the refrigerator. Deciding to make it non-permanent, I glued on magnet tape and round heavy duty magnets.


While the glue dried, I applied chalkboard contact paper onto the upper part of the fridge where it would be framed in. 


When the magnets were securely glued, I just placed the wooden frame over the chalkboard. Then placed the beadboard under the chalkboard frame. The magnets cling both sections onto the fridge very well!


The results: A great solution to the problem! 


A huge chalkboard that's magnetic too! Perfect for appointments and other memos.


Reminders can't be missed staring at your face each day. I think I like it. It's a keeper.


It's organized and has a much better appearance.


Of course, painting the kitchen cabinets white helped blend the fridge into the room for a neater look. 

I'll reveal the whole farm style kitchen redo next week. I'm still finishing up. (Too many things going on and not enough coffee this week!)


This little project was super easy to do and ended up as a very inexpensive cover up. Don't you love the idea of keeping track of reminders in a convenient area? 


Interested in the chalkboard roll or the beadboard ? This is what I used.

(affiliate links)


Thursday, March 31, 2016

Farm Style Cutting Board Holder


It's time for another DIY Blogger Project Challenge!
Each month we have a different project to create based on a named material theme. This month it's chalkboard paint!


Today I'm sharing another repurposed thrift shop find. Remember those vintage wooden paper plate holders? I snagged one! It reminds me of a breadboard, so I thought it could be converted into a cutting board holder. Something I need to keep my breadboards and cutting boards from slipping on the counter top. 


There were 2 problems with it.

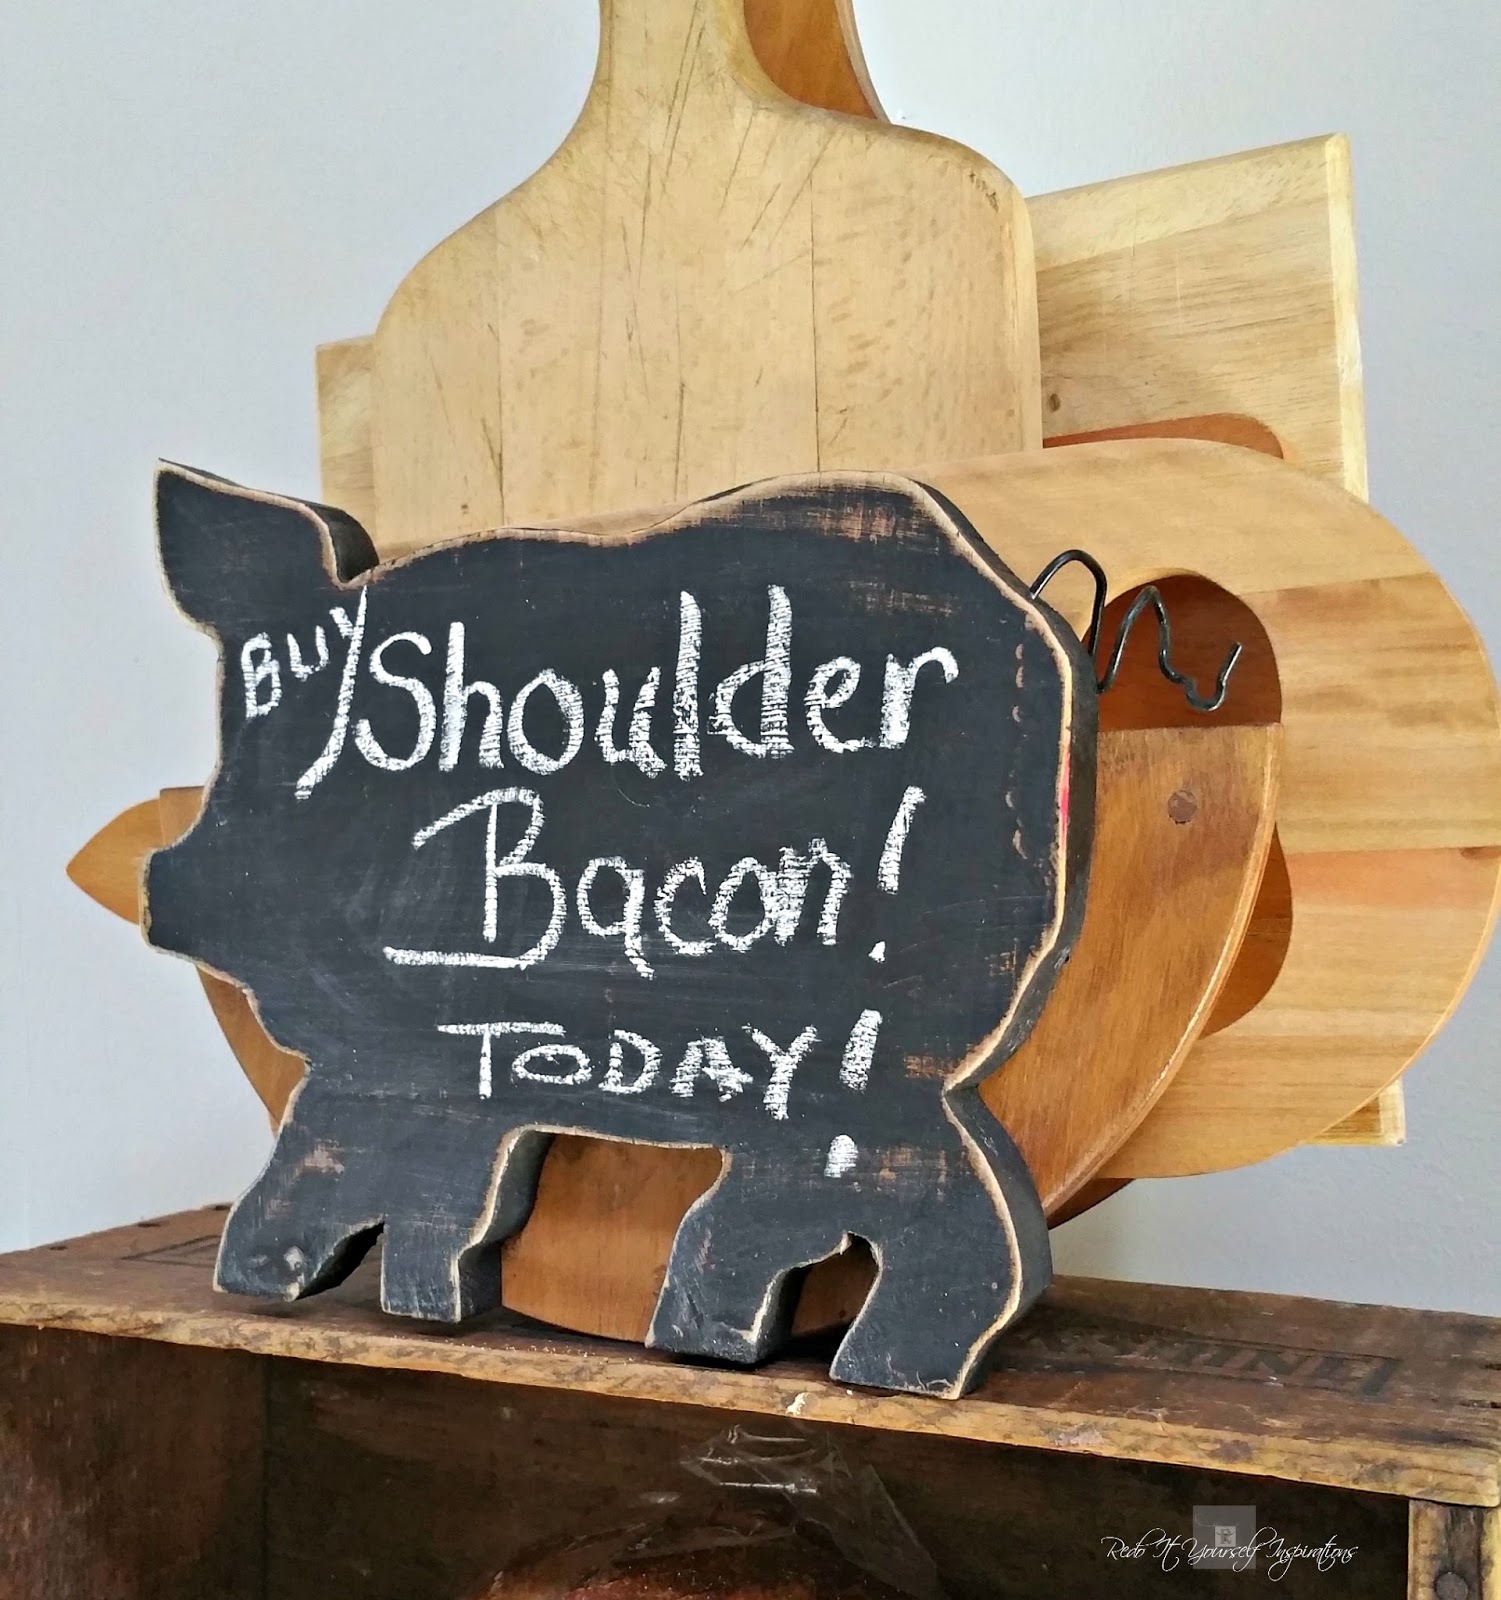
1: The fact it was round and if I wanted to use it on the counter, it would roll from side to side.  To stabilize it, a piece of wood could hold it upright. And that's where my chalkboard theme comes in. I chose to use a wood farm animal shape as a chalkboard; mounted onto the front of the holder.

2. There were two dowels in the way of putting bread boards and cutting boards into the holder. So I cut them off with a coping saw.

While the front was still open, I drilled holes to attach my pig chalkboard when it was finished.


To make the pig chalkboard, I reclaimed some wood from my scrap box and drew the pig outline with chalk.

See that... a chalk board!
Ok, I'm joking!

It was the best way to see my overall pig shape before cutting it out with the scroll saw. It's forgiving this way. Easy to draw and erase with a towel to get it just right.


Once I cut it out, I sanded it and painted it with the chalkboard paint.

Of course, a pig must have a cute little curly tail. So, I drilled a hole for the tail.
Then, using a wire clothing hanger, I snipped off a piece of it and twisted it with two pairs of pliers.
To attach it, I dropped super glue into the drilled hole and placed the curly tail into it.
After the glue set, I painted the wire tail.
Finally, attached the chalkboard onto the plate holder with screws... well, board holder now. And sanded the edges of the pig all the way around for a nice old distressed look.


Because I left the original drilled holes for hanging, the board holder can be wall mounted.


Or, the way I prefer, sitting on the table or countertop.


It has plenty of room to fit all of my boards. 


And because it has no height or width restriction, any size board can slide in place.


As a chalkboard... kitchen reminders can be written on it. After all, some things are too important to forget!


What is nice about the original back on this is... it looks like another breadboard. It just blends right in. 

vintage paper plate holder

I'm already glad this is keeping my boards in place and wonder why I never thought of it before!


If you like farmhouse style, this is a pretty handy "two-in-one" kitchen gadget!


Featured at


Our Mini Linky Party

I hope you enjoyed this repurpose idea and will check out the rest of our chalkboard paint projects below! 

All of the DIY Project Bloggers have prepared some amazing posts for you this month!


Thursday, January 28, 2016

Upcycled Wine Bottle Crate


January Project Challenge


Guess what? I've joined the 2016 monthly DIY blogger project challenge! It's super exciting! Each month we have a different project to create based on a named material theme. This month it's spindles/moulding/trim. 

I had some moulding left over from our kitchen project and a wooden wine crate from a thrift shop. My idea was to create a framed in chalkboard lid and turn the crate into a vintage or antique storage box.


The supplies I needed were: chalkboard contact paper, wood glue, stain, dark wax, and a rope handle. 


First to do, was miter cut the moulding to the size of the lid of the box. 


Setting those aside, I cut the chalkboard paper to fit on the lid and exposing 1/2 inch of the wood around the outside edges for gluing the wood trim on. 

Then, smoothed the chalkboard paper on. Glued the trim on with a small amount of glue on the exposed wood area on the lid. 

And, finally, added a cast iron griddle for weight until the glue dried. 


Once the glue dried, I stained the entire box inside and out. Then dark waxed all of the crevices and imperfections for an aged look. 


For the rope handle, I applied the dark wax to make it look old as well. 


By slipping the rope into holes, a handle is made by tying the ends into knots at the inside of the box to hold it in place. 


Hanging it on the wall makes a great memo board. 


And keeping pens and pencils inside is a nice way to stay organized. 


It has the antique look I was going for. 


Cute and functional! 


Now that this project is crossed off my list... I need to work on the others.  


But before that, let's have a cup of coffee and check out more of the project challenge from the rest of the group!


Featured at