


 |
| There is something about summer nights and outdoor lighting. It is a beautiful marriage that we enjoy during longer outdoor hours. |
After seeing so many repurposed solar chandeliers and trying one of my own, there was a realization... hey, why not modify all kinds of actual lighting fixtures for everywhere? At the garage, the garden shed, and the side tables! Just cut the cord!
I set out on a mission, gathering a few lamp pieces in the garage storage, going to the thrift shop and Walmart and grabbing some tools. HA! This is too easy AND exciting!
 |
Exhibit A: Cute little porcelain lamp. $3.99 @ Thrift Shop |
 |
Exhibit B: Brass candle holder wall sconce. $.99 @ Thrift Shop |
 |
I like it better upside down for outdoors, but being a solar unit, that is not happening. |
 |
Exhibit C: Ceiling fan light fixture. $2.99 @ Thrift Shop. |

 |
For the porcelain lamp, I took it apart, discarding the electrical parts into my electrical junk box.
Then painted the porcelain black.
|
 |
Snagged a solar lamp I had in a deck planter and some waterproof epoxy weld. Then globbed the stuff around the base of the plastic globe. |
 |
Put the lamp back together after the paint dried and wah-lah. |
 |
At dusk, the side table light was auto on! |
 |
For the candlestick wall sconce, I bought two of the small solar lights. |
 |
Painted the candle holder... |
 |
and when the paint dried, globbed on the epoxy and stuck the solar light sticks in the holders. |
 |
Too stinkin' easy! |
 |
Auto on at dusk and... it doesn't look like a basic solar light in the ground. |
 |
For the ceiling fan light fixture turned solar chandelier ... just five solar lights |
 |
A ceiling light fixture plate to attach a link chain to hang the fixture from. |
 |
Some paint for the ceiling plate and indoor/outdoor caulk. |
 |
To attach the chain to the fixture, I drilled a hole through the screw rod and linked up the chain. |
 |
Then globbed caulk around the base of the plastic globes. |
 |
Placed the globes into the fixture where light bulbs originally went.
(kinda looks like a kaleidoscope there... that's cool)
|
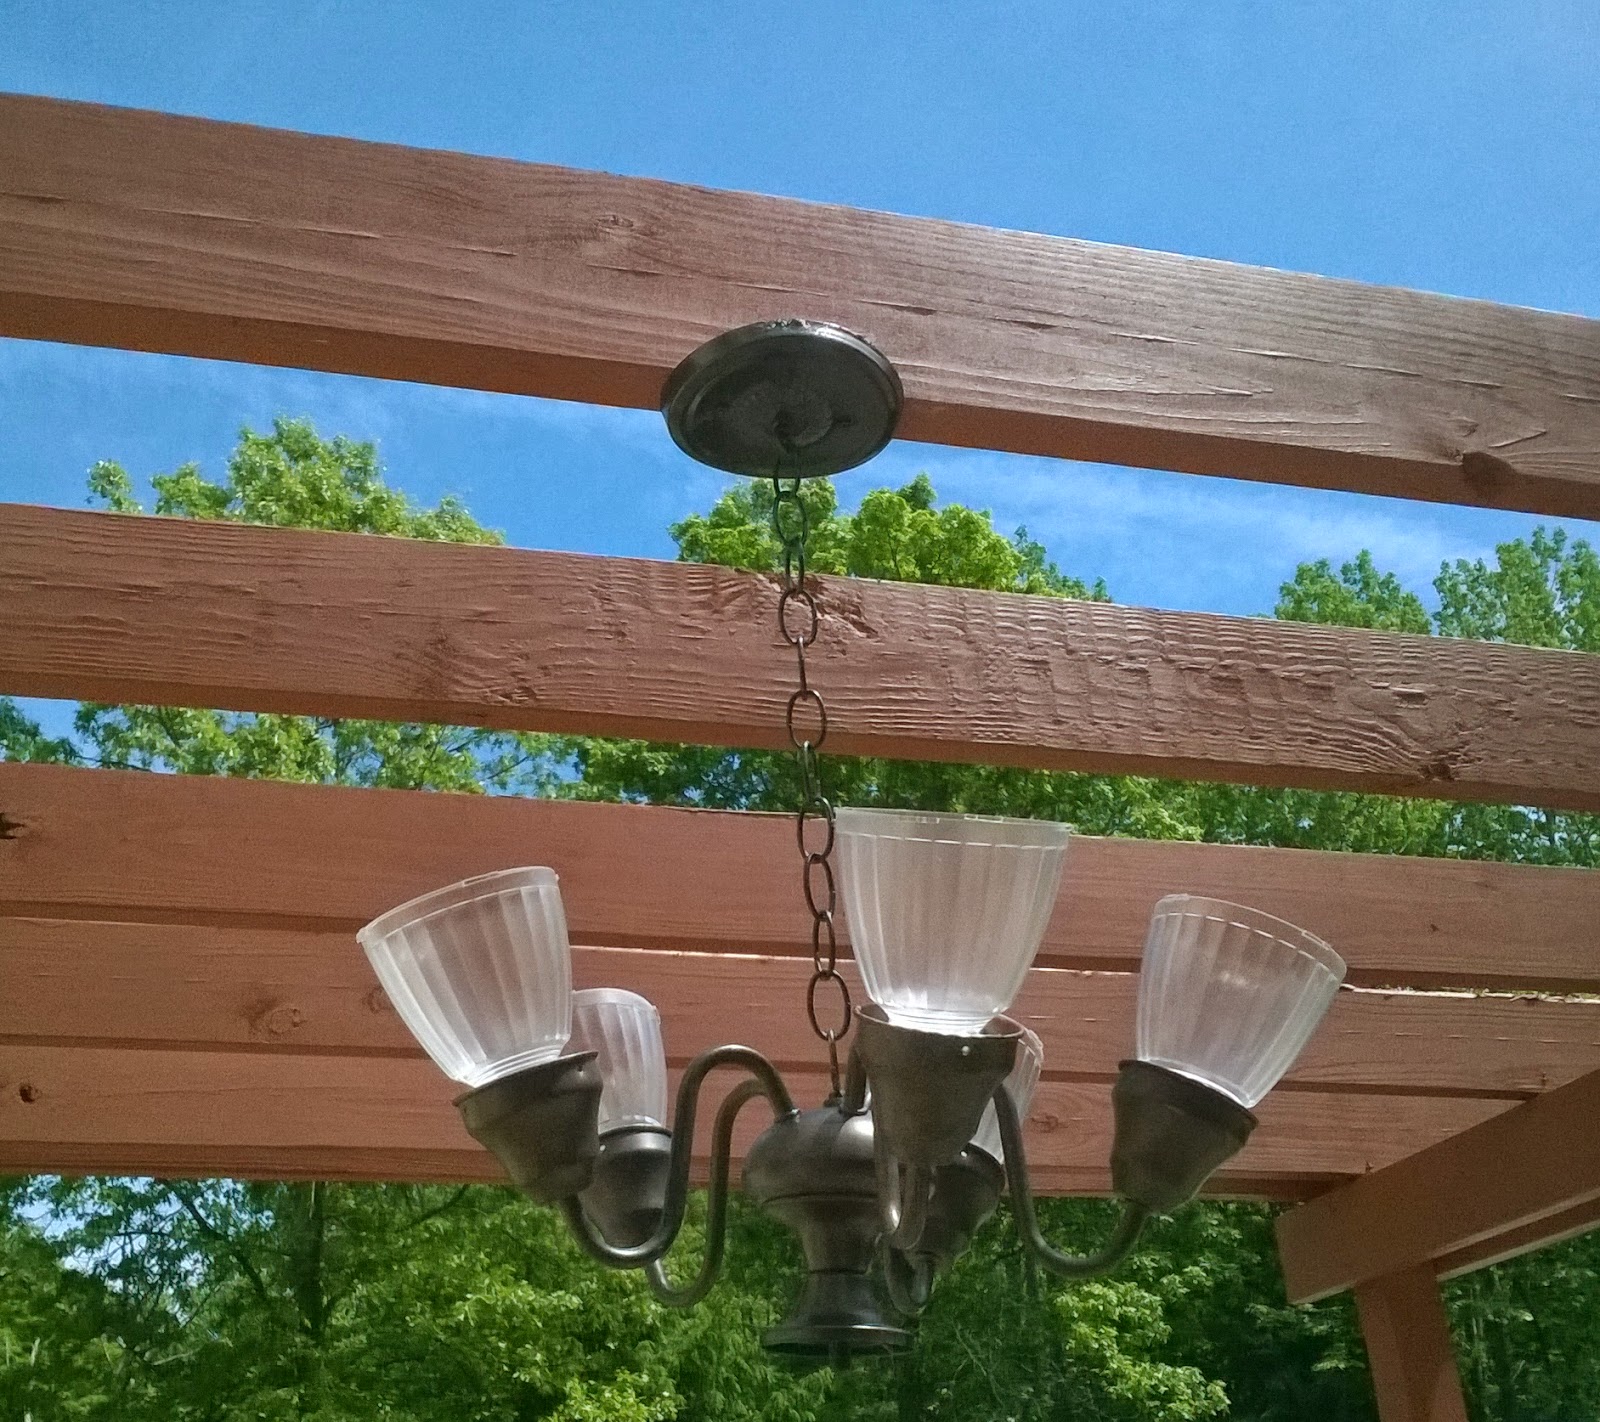 |
Then mounted the plate on one of the pergola beams and hung the fixture to dry the caulk thoroughly... |
 |
to replace the solar tops. |
 |
Then enjoyed the lighting over the deck bar. |
 |
I got this wrought iron room divider with 18 candle holders throughout it for a mere $8 at the Thrift Shop. I mounted it on a wall at the deck. Then removed the candles and placed the small solar light tops in each. As a wall of lights, the deck is brightened up. |
 |
I use solar lights everywhere; hanging and taping them into the trees and landscaping. |
 |
On plant hangers... |
 |
drilled holes into the 4x4 posts for them on the BBQ deck... |
 |
and stake them around the pond which makes the frogs happy because... it helps them eat dinner. |


I have a few more fixtures to add here after I gather some more parts for them. Stay tuned and go ahead and cut some cords!
Update: The new post "Cut the Cord" Part 2 is finished! Posted here----->

 |
~~~~~~~~~~~~~~~~~~~~~~~~~~~~~~~~~~~~~~~~~~~~~~~~~~~~~~~~~~~~~~~~~
Featured at
Be Awesome Link Party No. 8


What an awesome idea!! Need to pass this on and make some myself! Love them!
ReplyDeletePinning it!
Thanks for sharing!
I have a few more that I'll add here. But I was having so much fun with this I posted before finishing them all. It's just too stinking easy and with summer so short, had to share ASAP!
ReplyDeleteThanks, Jennifer. It's amazingly easy. You are going to have too much fun with this.
ReplyDeleteCan't wait to see those! Thanks!
ReplyDeleteFabulous idea! I would love to try this. I see great lights at the thrift store all the time.
ReplyDeleteNever thought to do this but this is genius!! These would be great on the back deck.
ReplyDeleteI can't wait to see yours. You are going to have fun! This is a craft that is way too easy and can get quite creative.
ReplyDeleteThat is where I put mine, Rachel and it is so awesome to have solar accent lights in unexpected fixtures and places.
ReplyDeleteWhat a creative way to save on energy bills. Thanks for sharing at #theWeekendSocial. Hope to see you back on Thursday 9:00 PM EST. Pinned! theKitchenChopper.com
ReplyDeleteWhat awesome ways to display those solar lights. I love the table lamp, it looks so cool!
ReplyDeleteThanks for sharing at Marvelous Monday on Smart Party Planning ;-)
Great redo for sure!! That black & gold combo makes a real statement for sure--I dig it!
ReplyDeleteThanks for linking up to our Betwitchin Party! Be sure to come back every Sunday starting at 6am EST over at OurMiniFamily.com to link up your projects again!
~Cathy Mini~
You're welcome :)
ReplyDeleteThank you for stopping by!
What an awesome redo! Great pictures too! Thanks for linking up at Whatever Wednesday. Pinned!
ReplyDeleteI look forward to it! Thanks, Cathy!
ReplyDeleteI appreciate the pinning! Thanks, Emily!
ReplyDeletegreat job! I have painted 2 lamps for this exact purpose, but they ended up being too tall, or not tall enough for the solar lights I bought. Not giving up.... I'll make it work eventually.
ReplyDeleteWhat a clever idea! I so want to do this for my own backyard! Thanks for linking up to the Be Awesome party! :)
ReplyDeleteI'm finding the same situation with the different fixtures, only certain solar lights will suit the piece. This is one of those projects that takes time because of waiting for the right parts. I'm in the process of being on hold with a few that I'm working on.
ReplyDeleteThank you, Gail, you made my day stopping by! :)
Hi Tara! Have fun doing this and I hope you share yours!
ReplyDeleteWOW these are such clever ideas, I love them all, such a great way to provide a bit of ambiance to a yard!!!
ReplyDeleteThanks for participating in last weeks party, I wanted to stop by and invite you to this weeks "Weekends Are Fun Party" Oh My Heartsie Girl, again this week. Hope to see you there!!
Love these ideas. And I definitely want to try the solar lamp idea. Hmmm...cannot wait.
ReplyDeleteAlso...thank you for sharing at Share it Sunday last week. You had some of the top votes so we featured you this week and are sharing out on our FB page this week. We shared last week as well.
ReplyDeleteVery cool ideas! I bet it looks incredible in person. Thanks for sharing with the Merry Monday Linky Party!
ReplyDeleteI love these! Thanks for sharing at The Southern Special. I will be sharing your link on Tuesday morning as a "host favorite" great job!
ReplyDeleteHi Karen! Thank you for the invite!
ReplyDeleteI'm posting a few more in the next couple of days. I hope you check back this week for the update in case you like those better.
ReplyDeleteHa! I found your note today @FB and got so excited over it! Thank you so much, Denise!
ReplyDeleteThank you for the invite and visiting! :)
ReplyDeleteThrilled! I look forward to the next party! Thanks so much, Dawn :)
ReplyDeleteThis is awesome. Drop by and share your post at this week's party if you have time. Hope this find you well! Theresa @DearCreatives
ReplyDeleteJust amazing, all of it from start to finish. Wonderful wall of lights too. Will you bring them all in during the winter?
ReplyDeleteThanks, Sue! I usually keep the lights outdoors all year, but will put the table type lamps in the garden shed for the winter. I even leave the lights staked at the pond during the snowy months and it really looks pretty with the snowdrifts getting "highlighted" at night :)
ReplyDeleteI will be happy to! Thank you for the invite!
ReplyDeleteI haven't tried the string lights yet. I must! That would be wonderful under the pergola! Thank you for the information!
ReplyDeleteHere's a little tip for you; The "Solar Cell" part of the light doesn't have to stay where the maker places it in the light. The cells can be moved to a location that receives better sunlight, simply extend them by adding wires.
ReplyDeleteGreat tip! Do you need to get creative to disguise the wiring though? I'd like to try it! Thank you!
ReplyDeleteThank you admin for such valuable content, keep doing the good work on, if you are willing to read more like this, consider
ReplyDeletereading about some solar home lighting system manufacturer in
india. this is the right choice for solar products.
https://www.seminglighting.com/Products/UFO-LED-Grow-Light-90W-918.html
ReplyDeleteThe UFO LED grow light is named because of its shape. Like other planting lights, the UFO led plant growth lamp provides the correct lighting conditions for plants. In addition, the LED light emitting lamp is designed with a double cage structure, which changes the heat dissipation mode from the traditional LED light emitting lamp.
Hello Dear,
ReplyDeleteThe blog was absolutely fantastic! Lot of great information which can be helpful in some or the other way. Keep updating the blog, looking forward for more contents.
Find the best stainless steel solar lights outdoor pathway, solar garden lights outdoor stakes, solar pathway lights outdoor waterproof bright, solar path lights outdoor waterproof bright led, solar walkway lights outdoor waterproof bright led, solar driveway lights outdoor, solar stake lights outdoor bright led & solar stakes for garden Online shopping from a great selection at Sogrand Industry Inc Store.
Visit Now - https://www.amazon.com/dp/B079CR1823
Sogrand Industry,Inc,15 Years Solar Light Manufacturer Directly Sells on Amazon.
Phone: (1)7089951996
E-mail: shsogrand@gamil.com
Address: 8940 192nd Street,Unit H,Mokena,IL60448 USA
Best Solar Lights Collection shop : https://www.amazon.com/shops/sogrand
THICK GLASS LAMPSHADE:The solar landscape lights are made with a thick crafted glass lampshade to intensify the beauty and luminescence of its LED light. The ribbing of the glass design says quality and creates an effect that will have all your guests talking.
ReplyDeletestainelss steel solar lights outdoor pathway
stainelss steel solar light outdoor
solar garden lights outdoor
stainelss steel solar pathway lights outdoor
stainelss steel solar path lights outdoor
stainelss steel solar walkway lights outdoor
stainelss steel solar driveway lights outdoor
outdoor solar lights for walkway
solar landscape lights outdoor
solar yard lights outdoor
Sogrand Industry,Inc,15 Years Solar Light Manufacturer Directly Sells on Amazon.
Best Solar Lights Collection: https://www.amazon.com/shops/sogrand
Hi Dear,
ReplyDeletei Like Your Blog Very Much..I see Daily Your Blog ,is A Very Useful For me.
You can also Find solar landscape lights Amazon.com: Sogrand Solar Lights Outdoor Pathway Decorative Garden Stake Light Decorations Waterproof Bright Warm White LED 15 Lumen 2018 of The Day For Outside Landscape Walkway Yard 6Pack: Garden & Outdoor
Visit Now:- https://www.amazon.com/dp/B07DJNH52Y
Hello Dear,
ReplyDeleteThe blog was absolutely fantastic! Lot of great information which can be helpful in some or the other way. Keep updating the blog, looking forward for more contents.
Hanging solar light - Get the best deal on party decorations, bar decorations, solar hanging lights, mason jar solar lights, solar mason jar lights, decorative jars, hanging solar light, solar garden decorations on amazon.com from great selection at Sogrand Industry Inc Store.
Visit the product page: -https://www.amazon.com/dp/B07CSJPCQG
Sogrand Industry,Inc,15 Years Solar Light Manufacturer Directly Sells on Amazon.
Best Solar Lights Collection Storefront: - https://www.amazon.com/shops/sogrand
Hello Dear,
ReplyDeleteThe blog was absolutely fantastic! Lot of great information which can be helpful in some or the other way. Keep updating the blog, looking forward for more contents.
decorative solar lights - Get the best deal on decorative solar lights, solar outdoor lights, solar lamp, solar stake, outside solar lights, solar landscape lights outdoor, solar garden pathway, walkway & path lights outdoor on amazon.com from great selection at Sogrand Industry Inc Store.
Visit the product page: - https://www.amazon.com/dp/B079CRSZLC
Sogrand Industry,Inc,15 Years Solar Light Manufacturer Directly Sells on Amazon.
Best Solar Lights Collection Storefront: - https://www.amazon.com/shops/sogrand
Hello Dear,
ReplyDeleteThe blog was absolutely fantastic! Lot of great information which can be helpful in some or the other way. Keep updating the blog, looking forward for more contents.
Solar deck post lights - Get the best deal on solar post cap lights 4x4, solar post lamp, solar post lights outdoor, solar deck post lights, solar fence post lights, solar lights outdoor post cap 4x4, solar fence post cap lights & solar deck post cap lights on amazon.com from great selection at Sogrand Industry Inc Store.
Visit the product page: - https://www.amazon.com/dp/B07CWGRSZM
Sogrand Industry,Inc,15 Years Solar Light Manufacturer Directly Sells on Amazon.
Best Solar Lights Collection Storefront: - https://www.amazon.com/shops/sogrand
Hello Dear,
ReplyDeleteThe blog was absolutely fantastic! Lot of great information which can be helpful in some or the other way. Keep updating the blog, looking forward for more contents.
Hanging solar lights - Get the best deal on solar jar, solar jar lights, hanging solar lights, jar decorations, decorative jar, gift jar, garden jar, mason jar solar lights, table decorations & tabletop decorations at amazon.com from great selection at Sogrand Industry Inc Store.
Visit the product page: - https://www.amazon.com/dp/B07CLD5KRN
Sogrand Industry,Inc,15 Years Solar Light Manufacturer Directly Sells on Amazon.
Best Solar Lights Collection Storefront: https://www.amazon.com/shops/sogrand
Hello Dear,
ReplyDeleteThe blog was absolutely fantastic! Lot of great information which can be helpful in some or the other way. Keep updating the blog, looking forward for more contents.
Solar lights outdoor - Get the best deal on solar lights outdoor, solar light, solar garden lights, solar garden decorations, solar pathway lights, solar path lights, solar walkway lights, solar yard lights, solar landscape lights & solar stake lights at amazon.com from great selection at Sogrand Industry Inc Store.
Visit the product page: - https://www.amazon.com/dp/B07DJNH52Y
Sogrand Industry,Inc,15 Years Solar Light Manufacturer Directly Sells on Amazon.
Best Solar Lights Collection Storefront: https://www.amazon.com/shops/sogrand
Hello Dear,
ReplyDeleteThe blog was absolutely fantastic! Lot of great information which can be helpful in some or the other way. Keep updating the blog, looking forward for more contents.
Solar landscape lights outdoor - Get the best deal on decorative solar lights, solar outdoor lights, solar lamp, solar stake, outside solar lights, solar garden lights outdoor, solar pathway lights outdoor, solar walkway lights outdoor, solar path lights outdoor & solar landscape lights outdoor at amazon.com from great selection at Sogrand Industry Inc Store.
Visit the product page: - https://www.amazon.com/dp/B079CRSZLC
Sogrand Industry,Inc,15 Years Solar Light Manufacturer Directly Sells on Amazon.
Best Solar Lights Collection Storefront: https://www.amazon.com/shops/sogrand
Hello Dear,
ReplyDeleteThe blog was absolutely fantastic! Lot of great information which can be helpful in some or the other way. Keep updating the blog, looking forward for more contents.
Outdoor solar lights for walkway - Get the best deal on solar path lights, solar bollard lights, solar garden stake lights, solar stake lights, solar pathway lights, solar garden stakes, solar walkway lights, solar driveway lights, outdoor solar lighting & solar outdoor lights on amazon.com from great selection at Sogrand Industry Inc Store.
Visit the product page: - https://www.amazon.com/dp/B07HDDZXVS
Sogrand Industry,Inc,15 Years Solar Light Manufacturer Directly Sells on Amazon.
Best Solar Lights Collection Storefront: https://www.amazon.com/shops/sogrand
Hello Dear,
ReplyDeleteThe blog was absolutely fantastic! Lot of great information which can be helpful in some or the other way. Keep updating the blog, looking forward for more contents.
Hanging solar lights - Get the best deal on solar jar, solar jar lights, hanging solar lights, solar glass jar, solar lanterns, solar hanging lights, hanging solar lantern, mason jar solar lights, garden jar & jar decorations on amazon.com from great selection at Sogrand Industry Inc Store.
Visit the product page: - https://www.amazon.com/dp/B07CSJPCQG
Sogrand Industry,Inc,15 Years Solar Light Manufacturer Directly Sells on Amazon.
Best Solar Lights Collection Storefront: https://www.amazon.com/shops/sogrand