Thursday, March 31, 2016

Farm Style Cutting Board Holder


It's time for another DIY Blogger Project Challenge!
Each month we have a different project to create based on a named material theme. This month it's chalkboard paint!


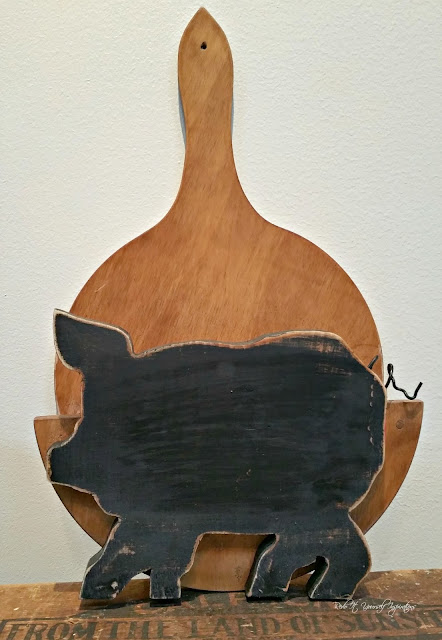
Today I'm sharing another repurposed thrift shop find. Remember those vintage wooden paper plate holders? I snagged one! It reminds me of a breadboard, so I thought it could be converted into a cutting board holder. Something I need to keep my breadboards and cutting boards from slipping on the counter top. 


There were 2 problems with it.

1: The fact it was round and if I wanted to use it on the counter, it would roll from side to side.  To stabilize it, a piece of wood could hold it upright. And that's where my chalkboard theme comes in. I chose to use a wood farm animal shape as a chalkboard; mounted onto the front of the holder.

2. There were two dowels in the way of putting bread boards and cutting boards into the holder. So I cut them off with a coping saw.

While the front was still open, I drilled holes to attach my pig chalkboard when it was finished.


To make the pig chalkboard, I reclaimed some wood from my scrap box and drew the pig outline with chalk.

See that... a chalk board!
Ok, I'm joking!

It was the best way to see my overall pig shape before cutting it out with the scroll saw. It's forgiving this way. Easy to draw and erase with a towel to get it just right.


Once I cut it out, I sanded it and painted it with the chalkboard paint.

Of course, a pig must have a cute little curly tail. So, I drilled a hole for the tail.
Then, using a wire clothing hanger, I snipped off a piece of it and twisted it with two pairs of pliers.
To attach it, I dropped super glue into the drilled hole and placed the curly tail into it.
After the glue set, I painted the wire tail.
Finally, attached the chalkboard onto the plate holder with screws... well, board holder now. And sanded the edges of the pig all the way around for a nice old distressed look.


Because I left the original drilled holes for hanging, the board holder can be wall mounted.


Or, the way I prefer, sitting on the table or countertop.


It has plenty of room to fit all of my boards. 


And because it has no height or width restriction, any size board can slide in place.


As a chalkboard... kitchen reminders can be written on it. After all, some things are too important to forget!


What is nice about the original back on this is... it looks like another breadboard. It just blends right in. 

vintage paper plate holder

I'm already glad this is keeping my boards in place and wonder why I never thought of it before!


If you like farmhouse style, this is a pretty handy "two-in-one" kitchen gadget!


Featured at


Our Mini Linky Party

I hope you enjoyed this repurpose idea and will check out the rest of our chalkboard paint projects below! 

All of the DIY Project Bloggers have prepared some amazing posts for you this month!


Wednesday, March 30, 2016

Homemade and Handcrafted No. 18

Every Wednesday 6 a.m. - Sunday 11:30 p.m.
Welcome to the Homemade and Handcrafted party!

I hope everyone had a wonderful Easter!
We had nice weather and filled the weekend with family fun and feasting. We enjoyed a big Sunday breakfast, a family treat basket, and ate Easter Pie for dinner. It's sort of a Spring Thanksgiving around here while celebrating.


Now off to this week's party!  

Feel free to link up your posts (new or old ones). We love seeing what you've been up to! Share your crafts, recipes, DIY, and inspirations! We love to visit other parties and enter giveaways; so you can link those up too!

Let's check out the top favorites from last week! 

Amazing, made from scratch,

 Tiered Stand by The Navage Patch


Incredible workbench makeover into

Outdoor Serving Station by The Crowned Goat


Yummy, gluten free,

Lemon Poppy Seed Muffins by Strength & Sunshine

Sweet DIY Florida vintage tutorial!

by Unique Junktique


Clever and cute fan blade makeover!

Zebra Fan by 2 Crochet Hooks


Featured Badge


Party Button

Thank you so much for taking the time to link up and share your creations and ideas!


Friday, March 25, 2016

Pinbellish Pinning Party No. 30

Welcome to Pinbellish!

A Pinning Celebration

Have you ever considered hosting a pin party? Pinbellish is looking for new co-hosts,  it could be you! Just email me to find out more. 

Pin Trivia of the Week:


Knitters Marking Pins

I can think of many uses for these pins such as blocking your knit project, but marking stitches? 

Link-up rules & Guidelines

  1. Link to your pinterest pin (not your blog - only links to pins get featured)
  2. Add up to 7 pins old or new (one for each day of the week!)
  3. Repin 2 pins for every link you add
  4. Follow your hosts on your favourite social media platform
At Pinbellish Pin Party please repin pins in Pinterest to promote Pinterest prioritising your pins to purfylle your Pinterest pinning pleasure. 

Meet & Follow Your Hosts

Sarah J of  Sarah Celebrates
Google+  |  Twitter  |  Pinterest  |  Instagram  |  Facebook  


Google+  |  Twitter  |  Pinterest  |  Facebook  


Stella Lee of  Purfylle 
Google+  |  Twitter  |  Pinterest  |  Instagram  |  Facebook  


Love the Pinbellish Pin Party?
Grab the Pinbellish party button for your blog, posts or sidebar!


Features
Image Map

Follow Purfylle's board Pinbellish Features on Pinterest.

Remember, if you ever miss a party you can check the Features Board to see if you've been featured in the past.


I was featured at #Pinbellish!
Tweet: I was featured at #Pinbellish! http://ctt.ec/NU8wb+


Disclosures: By submitting a link to the Pinbellish Link Up you are giving the party hosts permission to feature your image on our blogs, across social media and future round up posts.  Pinbellish hosts respect you and your work; everything will be properly linked back to you and credit given where credit is due.  


Love parties? Be sure to stop by the new anything goes, Handmade and Handcrafted Party


http://redoityourselfinspirations.blogspot.com/2016/03/every-wednesday-6-a.html

Wednesday, March 23, 2016

Plain Chair Pair into French Flair


This month's Fab Furniture Flippin' Contest is so much fun!!! 

The theme is "Mix and Match". Sooooo, I was really excited to take a pair of plain old seatless chairs from a yard sale and mix them up with a "French Flair"!  

The chairs had some issues to fix before transforming them. No seats. No problem. Loose joints and a screw showing on an attempted repair. AND apparently the initials carved in one of the backrests indicated that A.L.III was there at one point. 


So after wood putty filling and gluing; then cleaning and sanding, I was ready to create. I applied wood appliques to the top of the backrests. I wanted to attach a cushion to the backrest, so before painting, I made a pattern to cut my wood and foam. Then, I painted the chairs. 

I purchased my wood appliques from D. Lawless Hardware.

For my project, I needed foam for my seats and backrest cushions. I was kindly supplied with enough "Project Foam" to complete them.


(Disclosure: Project Foam was supplied by Fairfield World for the use of my project and my post opinions are my own.)


I cut plywood for the seat bases and added the foam. I cut luan from the pattern I created and made the backrest cushions. Then covered the foam with linen and stapled it to underneath, followed by the fabric I chose. A black and white toile. 

I sewed a double welt and attached it with the upholstery before attaching the seats and backrest cushions.


Now that the hard parts were done, I glazed the appliques in a dark graphite to finish the chairs.


Now a pair of old traditional and plain dining chairs are mixed up with a delicate French touch!


So, back to the Fab Furniture Flippin' Contest. 

.

This month's theme is Mix and Match" and March participants were challenged to create a project using supplies sponsored and supplied by Fairfield World.


This contest is sponsored by Fairfield World; a third generation, family-owned business specializing in battingfoampillow insertsinterfacing and so much more.  Perfect for creating custom pillows and upholstery projects! Not only does Fairfield have an amazing selection of supplies, but offer tutorials and a gallery of inspirational projects.

The contest hosts are Evey at Evey's Creations and Stacy at Anastasia Vintage


~~~~~~~~
Featured!