Showing posts with label Crafts. Show all posts

Thursday, December 22, 2016

Easy DIY Dress Form Pin Cushion


Here's another thrift shop makeover!  I think a mini mannequin makes a perfect pin cushion due to its theme for sewing. Don't you think so too?  I bought this dress shaped jewelry hanger from a thrift store, specifically, to change it into a pincushion.

Everything I needed was pretty much "on hand" at home. All that I had to buy was the jewelry tree and the steel scrubbing pads.


Materials:
Spray paint
Stainless steel scrubbing pads
Polyfill
Plain paper for drawing a pattern
Scrap fabric
Iron on transfer paper
Hot glue sticks
Fabric trim
1 wooden screw head cover

First, I cut off the sides (or arms) of the jewelry tree with cutting pliers and spray painted the frame.

Once the paint was dry, I stuffed the inside of it with stainless steel scrubbing pads (to keep pins sharp).


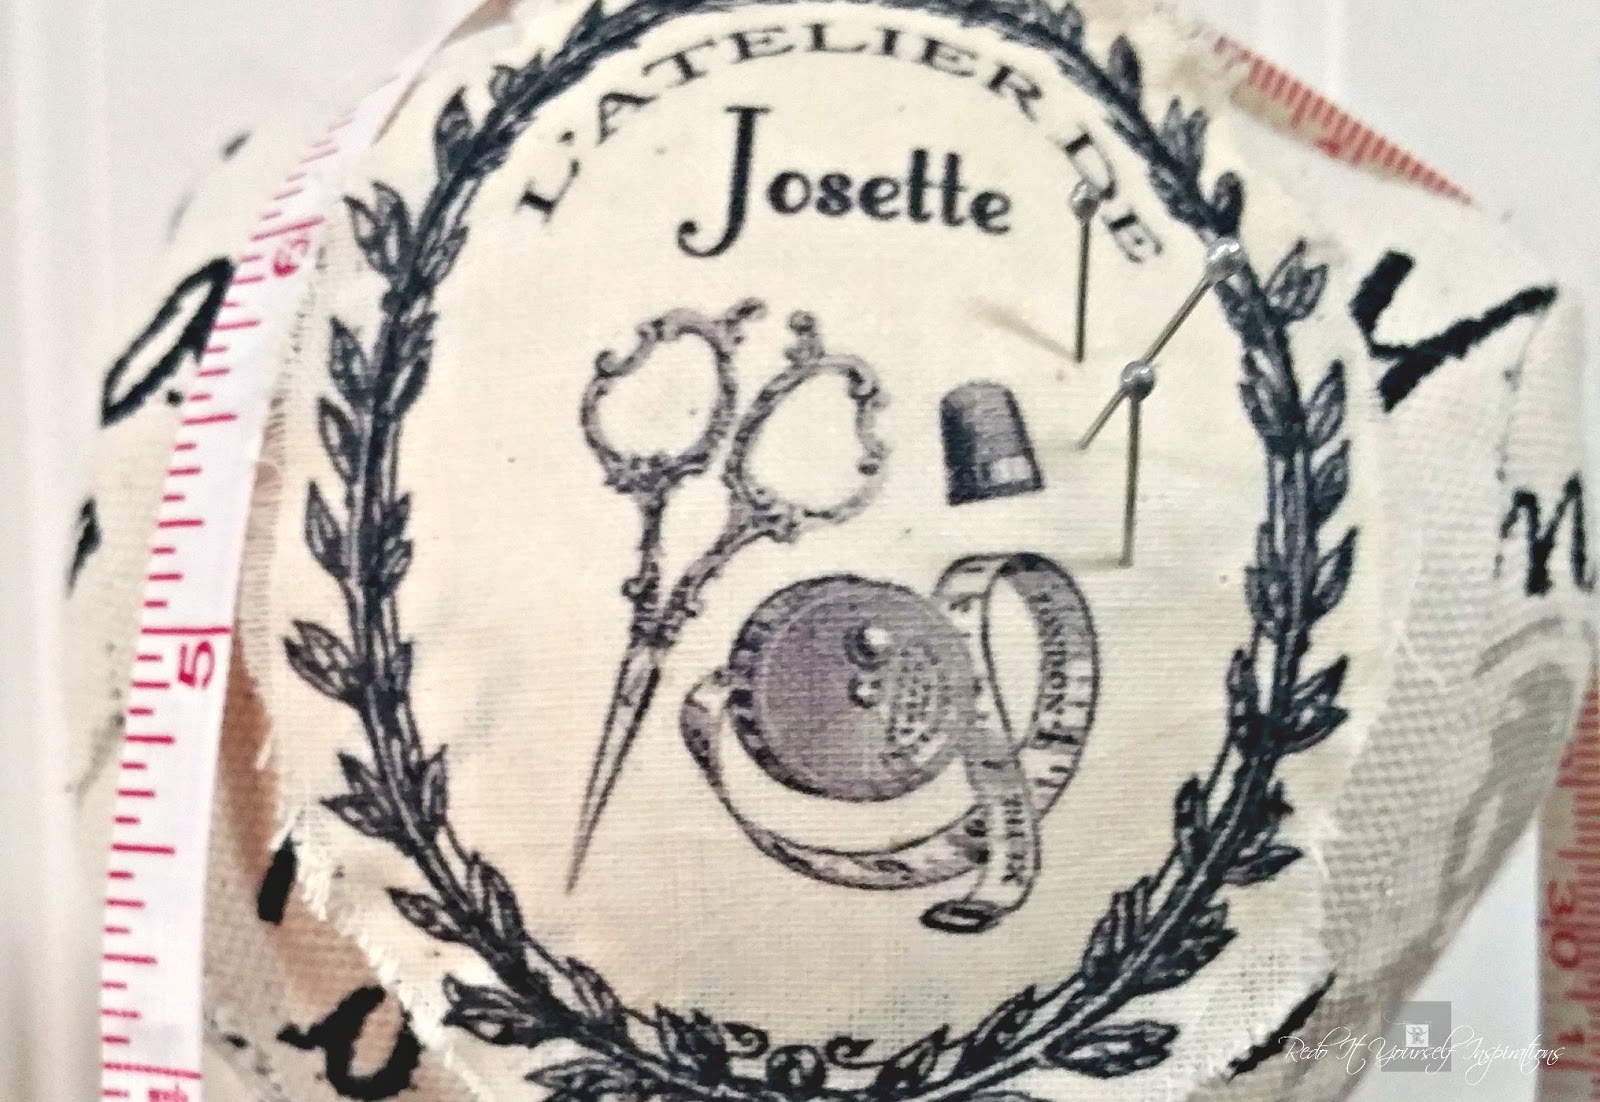
Then I traced around the frame to make a pattern for the dress form look. I also found a cute sewing themed image on Pinterest to print onto iron on transfer paper to sew onto the front.

After I ironed the image on, I cut it out of the fabric, stuffed it slightly with a little bit of polyfill, and sewed it onto the front body piece.


Once I sewed the dress form pieces together, I pulled it all the way down onto the jewelry hanger and stuffed it with polyfill between the frame and the fabric.

The neck (top) of the fabric was shoved inwards at the top of the frame. Then I glued on a wooden screw head cap to cover the opening.

After pulling the fabric all the way down the frame, I glued the fabric onto the metal frame and trimmed it, using hot glue.


Now that the dress form was done, I could finish stuffing the pin cushion at the bottom. I added another stainless steel scrubbing pad, more polyfill, and sealed it with a piece of cardboard.


This dress form pin cushion is about 14" tall and 8" around in circumference. Large enough to hold a lot pins and sewing notions for busy sewing projects.


The sewing notions in the transfer image are so fitting. 


With plenty of padding inside of the fabric, the shape was easy to achieve. Similar to stuffing an animal toy. 


The back isn't stuffed quite as much between the frame and the fabric, but pins are still able to stick through it. 


The bottom of the dress form has enough space for storing scissors and pencils. 


Keeping a measuring tape handy is easy by simply draping it around the form.


This was a fun project with pretty good results! 


This is how the idea started. 


Now, it's a really handy sewing notion that looks so cute... to me anyway. 


I just might make another... with a wooden base. Maybe two more... this is becoming a bit of an obsession. I'm starting to envision a sewing room with functional decor. 


Thursday, March 31, 2016

Farm Style Cutting Board Holder


It's time for another DIY Blogger Project Challenge!
Each month we have a different project to create based on a named material theme. This month it's chalkboard paint!


Today I'm sharing another repurposed thrift shop find. Remember those vintage wooden paper plate holders? I snagged one! It reminds me of a breadboard, so I thought it could be converted into a cutting board holder. Something I need to keep my breadboards and cutting boards from slipping on the counter top. 


There were 2 problems with it.

1: The fact it was round and if I wanted to use it on the counter, it would roll from side to side.  To stabilize it, a piece of wood could hold it upright. And that's where my chalkboard theme comes in. I chose to use a wood farm animal shape as a chalkboard; mounted onto the front of the holder.

2. There were two dowels in the way of putting bread boards and cutting boards into the holder. So I cut them off with a coping saw.

While the front was still open, I drilled holes to attach my pig chalkboard when it was finished.


To make the pig chalkboard, I reclaimed some wood from my scrap box and drew the pig outline with chalk.

See that... a chalk board!
Ok, I'm joking!

It was the best way to see my overall pig shape before cutting it out with the scroll saw. It's forgiving this way. Easy to draw and erase with a towel to get it just right.


Once I cut it out, I sanded it and painted it with the chalkboard paint.

Of course, a pig must have a cute little curly tail. So, I drilled a hole for the tail.
Then, using a wire clothing hanger, I snipped off a piece of it and twisted it with two pairs of pliers.
To attach it, I dropped super glue into the drilled hole and placed the curly tail into it.
After the glue set, I painted the wire tail.
Finally, attached the chalkboard onto the plate holder with screws... well, board holder now. And sanded the edges of the pig all the way around for a nice old distressed look.


Because I left the original drilled holes for hanging, the board holder can be wall mounted.


Or, the way I prefer, sitting on the table or countertop.


It has plenty of room to fit all of my boards. 


And because it has no height or width restriction, any size board can slide in place.


As a chalkboard... kitchen reminders can be written on it. After all, some things are too important to forget!


What is nice about the original back on this is... it looks like another breadboard. It just blends right in. 

vintage paper plate holder

I'm already glad this is keeping my boards in place and wonder why I never thought of it before!


If you like farmhouse style, this is a pretty handy "two-in-one" kitchen gadget!


Featured at


Our Mini Linky Party

I hope you enjoyed this repurpose idea and will check out the rest of our chalkboard paint projects below! 

All of the DIY Project Bloggers have prepared some amazing posts for you this month!


Monday, March 7, 2016

Cabbage Centerpiece


A fresh new centerpiece screams spring! This one started with a roll of toilet paper. (Really... it did!)


Toilet paper clay is smoother to work with than paper mache. It's soft and it's white, which makes it a blank canvas. 


Materials
  • Water
  • Toilet paper (about half of 1 roll... enough to make 2 cups of wet paper)
  • 1 cup joint compound (in the paint aisle)
  • 6 ounces white glue
  • 3/4 cup flour

I filled a large bowl with toilet paper and added water to it. And kept adding the toilet paper until I had about 2 cups of wet paper. 

Then squeezed out as much water as possible and tore it up into pieces.


Using a large freezer bag, I added the wet toilet paper, joint compound, glue and flour and mixed it together. (Just kept squeezing the bag.)

It formed a nice soft clay. 

Then I took a bowl the size of a cabbage and placed plastic wrap all around it. 


Taking handfuls of the clay, I placed it onto the plastic wrapped bowl to press a large cabbage leaf into it to make impressions all around the bowl.


I allowed the clay to form at the rim of the bowl to make the leaves appear as part of the cabbage wilting.

Then set the bowl in an airy place for a couple of days to dry thoroughly.

Once it dried, I painted it with green watercolors to make it more realistic.


After painting the cabbage bowl, I used polycrylic to clear coat and seal it.

Then the fun part... making the spring arrangement. I cut artificial peonies to fit into a floral foam inside the cabbage bowl.

And finally... a farm style floral centerpiece is created.


Pretty; isn't it?  Instead of cutting a real cabbage to make this, I found a way to have one that is preserved!


~~~~~~~~~~
Featured at


I'm also excited to be part of Hometalk's DIY My Spring! Home and Garden Blog Hop today. At the bottom of the post, you can see other Spring ideas for your home and garden. If you have a little extra time today, be sure to check some of the talent that is linked up below. And, if you don't already... you can follow me on Hometalk by clicking HERE.


Follow the event with #DIYMySpring